Restoring red back into blue/green underwater images
Preamble
I have split these tutorials into two different levels.
The ones on this page and the bottom menu linked pages are for people reasonably familiar with the GIMP interface and image manipulation commands.
The second is for people with very little experience of image manipulation programs and GIMP particularly. This includes screenshots for each step of the operations involved. Follow the title links for these more indepth tutorials.
Underwater image colour restoration tutorials
The methods detailed here are for restoring red colours back into blue/green underwater images using GIMP image manipulation software.
These methods will work fairly well, but you can't really beat using a decent strobe in the first place! Still, most divers who rent cameras don't tend to take up the seperate strobe option or find it too cumbersome, so here is some help reviving all those green photos that you had written off.
I've included quite a few variations on one theme, which I found on Scubaboard's site, all credit goes to David Kushner (user name mandrake) for coming up with the method. Do a search for 'Mandrake' and there will be plenty of posts showing the method.
The basic idea behind this method is to create a black and red image, which when merged with the original image should enhance the red that was missing. It should be stated that this isn't a one size fits all option, it is purely to get you started on the image manipulation road. Once you become a little more experienced, you can begin to experiment and improve your images further.
I have also included a Script-Fu (macro) for each method, which can be found on the Script-Fu download page.
Red enhance method 1
This method follows the mandrake Photoshop steps, the only difference is setting Background copy#2 Mode to Value instead of Luminosity.
Script-Fu
There is a Script-Fu (macro) for this tutorial, file name man.scm on our Script-Fu downloads page, see the script-fu help page if you need instructions on loading and activating it. This will work on GIMP versions below 2.4, there is a seperate version for the new GIMP 2.4.
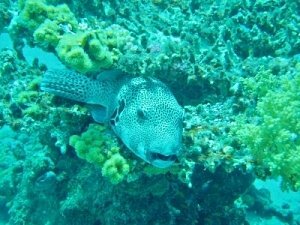
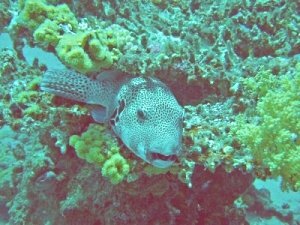
The images below are a before blue/green image and an after red enhanced image using this method.


Duplicate original image
On the main GIMP toolbar, open the layers dialogue
File » Dialogues » Layers
In the layers dialogue click Duplicate and create 3 copies of your image.
Fill second copy with FG colour
In the layers dialogue select Background copy#1. Double click on the Foreground colour in the main GIMP toolbar and type in the hexadecimal code 808080 (grey) in the HTML Notation option box.
On the image toolbar choose
Edit » Fill with FG Colour
Change third copy mode and merge down
In the layers dialogue select Background copy#2 and change its Mode from Normal to Value.
Right click on Background copy#2 and choose Merge Down to Background copy#1.
Duplicate new layer, fill with BG colour and change mode
With Background copy#1 still selected click Duplicate to create a new layer.
With the new Background copy#2 still selected, double click on the Background colour in the main GIMP toolbar and type in the hexadecimal code FF0000 (red) in the HTML Notation option box.
On the image toolbar choose
Edit » Fill with BG Colour
In the layers dialogue change Background copy#2 Mode from Normal to Multiply.
Merge down and change mode
Right click on Background copy#2 and choose Merge Down to Background copy#1.
Change the new Background copy#1 Mode to Screen and then right click on it and choose Merge Down to Background copy to make your red enhanced layer.
Adjust opacity and save
At this stage you will probably see a very red image, adjust the Opacity of the red enhanced layer in the layer dialogue, until the image colours look correct.
If you have any whites in the image, you can use them as a datum to adjust to. Once they look correct the other colours should follow.
When you have achieved the result you want you can right click on any of the layers and choose Flatten Image and then save the image.
If you are not sure or want to work on the image again later, save the image in GIMP's native .xcf format. This saves all the layers and information, except for the undo history. Be warned though, these files are BIG, make sure you have plenty of hard disk space if you are doing this with lots of images.
