Correcting underwater images taken without a flash
Preamble
I have split these tutorials into two different levels.
The ones on this page are for people reasonably familiar with the GIMP interface and image manipulation commands.
The second is for people with very little experience of image manipulation programs and GIMP particularly. This includes screenshots for each step of the operations involved. Follow the title links for these more indepth tutorials.
Correct dark photos tutorial
The methods below are for correcting lighting imbalance using GIMP image manipulation software. I've added extra comments where command locations differ from Gimp version 2.2 to 2.4 & 2.6.
These methods will work on dark underwater or normal dry land images. The one we generally use is the contrast mask (Method 1), but try all three and see which one you prefer.
For underwater images taken below 5m you will need to implement an extra colour enhancement filter method, which I have written a tutorial for.
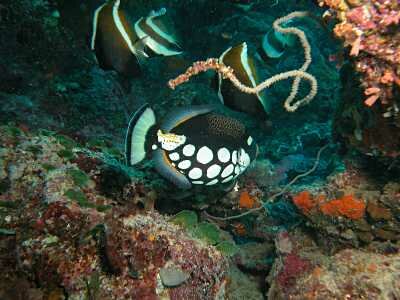
Find one of your photos that you thought were fantastic, but came out very dark, due to not using a flash. I've used a customer's photo for this tutorial.

Method 1 Contrast Mask
This method corrects the exposure of dark areas without overexposing bright areas. Compare the before & after photos.
There is a Script-Fu (macro) for this tutorial based on one written by Jeff Stephens, the file name is create-contrast-mask.scm and can be found on our Script-Fu downloads page. See the Script-Fu help page if you need instructions on loading and activating it. This will work on GIMP versions below 2.4, there is a seperate version for the new GIMP 2.4 called create-contrast-mask24.scm on the same Script-Fu downloads page.
On the main GIMP toolbar, open the layers dialogue found under
Windows » Dockable Dialogs » Layers
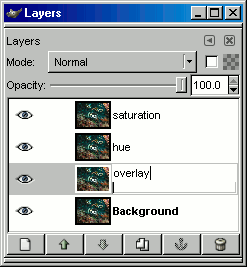
In the layers dialogue click Duplicate and create 2 copies of your image.
Select Background copy#1 and change its Mode from Normal to Hue.
Now duplicate this layer and change the new layers Mode to Saturation.
To make life easier for this tutorial I'll rename the layers to reflect their mode state.

To monitor the effect of the next stages turn off the hue and saturation layers (by clicking on the layers eye). Then select the layer named overlay and change Mode from Normal to Overlay.
On the image toolbar desaturate the layer
Layer » Colours » Desaturate  (GIMP 2.2)
Colours » Desaturate  (GIMP 2.4 & 2.6)
Then on the same toolbar invert the layer
Layer » Colours » Invert  (GIMP 2.2)
Colours » Invert  (GIMP 2.4 & 2.6)
You should notice the image is now a lot clearer.
Now apply a Gaussian Blur
Filters » Blur » Gaussian Blur
The default Blur radius is 5px, for this 2560×1920 image we've changed this to 22px. As a rule of thumb make the blur radius 1% of the average image size. Use the calculator below to work out your blur radius.
At this stage you can play with the Opacity of the overlay layer in the layer dialogue. 80% opacity is a good starting point, but tweak it until it looks ok. Alternatively you could duplicate this layer to brighten the image even more.
Turn on the hue and saturation layers. These two layers are kept so that the colour information is natural to the background image. If you feel they enhance the image keep them, otherwise feel free to delete them. If you want to know more about hue and saturation there is a full tutorial at Cambridge in Colour.
Method 2 Grayscale Mask
This method also corrects the exposure of dark areas without overexposing bright areas. Compare the before & after photos.
On the main GIMP toolbar, open the layers dialogue found under
File » Dialogues » Layers
In the layers dialogue click Duplicate to create a copy of your image and make sure it is selected.
With this layer selected add a layer mask found on the image toolbar
Layer » Mask » Add Layer Mask
This presents you with some mask options, choose
Grayscale copy of layer and check the Invert Mask option.
In the layers dialogue change the Mode of the duplicated layer to Screen.
At this stage you can play with the Opacity of the overlay layer if you feel the image is too washed out. Alternatively you could duplicate this layer to brighten it even more.
Method 3 Levels and Gamma
This method manipulates and improves the brightness of colors manually. Compare the before & after photos.
On the main GIMP toolbar, open the layers dialogue found under
File » Dialogues » Layers
In the layers dialogue click Duplicate to create a copy of your image and change the Mode to Value
With this layer selected open the levels dialogue found on the image toolbar
Layer » Colours » Levels  (GIMP 2.2)
Colours » Levels  (GIMP 2.4 & 2.6)
Click the Auto option, which will activate Gimp's automatic correction of colour, contrast and brightness.
If this doesn't improve the image sufficiently manually adjust the Input Levels triangles (top slider in levels dialogue) the black for dark tones, the grey for midtones (Gamma) and the white for light tones.
Or the Output Levels for brightness or darkness correction.
Completing all three methods
When you have achieved the result you want you can right click on any of the layers and choose Flatten Image and then save the image.
If you are not sure or want to work on the image again later, save the image in GIMP's native .xcf format. This saves all the layers and information, except for the undo history. Be warned though, these files are BIG, make sure you have plenty of hard disk space if you are doing this with lots of images.
To compare all three methods with the original image go to the results page.
